Pages

Tuesday, August 28, 2012

The Classics: Baked Cheesecake

I was grumpy yesterday morning.
Because I had to travel to Bandra. In.the.pouring.rain.!!
I'm running around (read: postponing packing as much as I can) move soon and yesterday hanging out with three very close girlfriends, chatting over thai pot rice and a very big wedge of chocolate mousse cake I realised that maybe rainy afternoons are'nt all that bad..
And how girlfriends are so under rated!!!
(ermmm....I don't mean this if you are a boy :p )
I mean,imagine if you had to hang out with  boys ALL the time.
Would they be willing to discuss which stall at hill road has the best deals for flats ?
Would they be able to tell you which kajal ACTUALLY does not smudge?
Would they be able to save you from the frizzy hair days that make you look like you got struck by lightning?
Would they not judge you if you wore purple pants???
Would they?
I did'nt think so.

My closest girlfriends have saved my sanity.A million times over.
Thank You.
:)


Anyway...I have some news.....
So I randomly was going through the overview section of the blog yesterday and apparently it's crossed 11,000 views!!!
Whoop !!Whoop!!!
 So I decided to share a classic that I uaually end up making at family celebrations ,or christmas or just when a craving strikes....Baked Cheesecake.


I'm not a big fan of cold set cheesecake...You know, the ones that use hung curd and gelatin and whatnot and then you just let them set in the fridge. Actually I think thats just a plain ol' insult to the amazing dense baked cheesecake.
I mean c'mon ...its cheesecake....DO IT RIGHT!!!!


Baked Cheesecake Cupcakes:
Adapted from BBC GoodFood Issue 1

For the crust
digestive biscuits 180gms
butter 100-150gms
powdered sugar 2tbsp(or as per your taste)
vanilla ess 1/2tsp

  •  Powder the digestive biscuits.Melt the butter and mix all the ingredients for the crust together.It should resemble the consistency of wet sand.A good way to test if you've got the right consistency is to squeeze a portion of it tightly in your hand, it should hold together for a few seconds and not crumble apart immediately.
  • Press this evenly into the base of silicon cupcake moulds. (You can also make a full sized cheesecake instead of these mini ones)
  • Grease the base of the cake tin first if you are'nt using silicon.

For the cheesecake:

 Cream cheese 600gms
 Powdered sugar 200gms
 Eggs                   3
 Fresh cream        200gms
Vanilla essence     a tsp

  • Preheat the oven to 180'C. And heat some water upto boiling point.Combine cream cheese and sugar in a bowl and beat well till smooth.
  • Add oin the eggs, one at a time, mixing well between each addition.Make sure to scrape the sides and bottom of the bowl from time to time so u dnt get lumps at the end.
  • Add in vanilla ess and cream and beat well till blended.
  • Pour over the crust and tap the mould on the table once to get rid of any air bubbles
  • Place the mould into a waterbath with wateralmost upto halfway upto the sides of the cheesecake tin
  • Cover with tin foil and Bake at 180'C for about 12 min.The cakes should still have a bit of a jiggle in the center.
  • |Turn of the oven and let it rest in the oven for abt 40 min
  • Chill the cheesecakes overnight. (if I'm in a hurry I allow them to set in the freezer for a few hours instead)
  • Serve topped with fresh fruit...mango/strawberry/or any berry syrup or preserve work well!!!


Monday, August 06, 2012

Mojito Cupcakes

Have you looked out the window today?
It's too darn grey :/
Not a colour I'm particularly fond of, especially when it comes with slushy muddy streets .
eeeeks.

 Luckily even though it was lazy and rainy all day yesterday, right when these were done in the oven, the sun came up for just a few mintues to help me pretty up the pictures.
Boo yeah.

Once in a while you come across a recipe that you just HAVE to try. Now, most people just look at the pretty pictures in magazines or cookbooks and move on . But every now and then, the skies open up and a light shines through and you know that there will no longer be peace in the universe until you make the recipe.
 This recipe was  for a mojito cake that I saw on Masterchef Australia  sometime last week, and after that I've been waiting to try it , every chance I get.
After all, EVERYTHING is better with rum.
Or so they say.


 This lil' pigeon has managed to make a nest in one of the flowerpots outside our window and she is now sitting nice and toasty on three tiny eggs!!


;)

So, it's safe to say that all is well in the universe again, because I managed to whip these up and share em' with some very happy (and lucky, mind you :P:P) friends yesterday.
These are my version of friendship bands.
I have a feeling I've just started a new tradition here.
:)

While I was watching the Masterclass episode where these were made, they seemed pretty darn easy. Its just a simple cake, a buttercream frosting and a little flavoured syrup. After that it's just a matter of assembling it all.
The cake is all fancy because it does'nt use baking powder/baking soda for leavening, the eggs do all the work!! It's called a Genoise sponge, and honestly, I'd be lying if I said I was'nt a bit worried. But they turned out perfectly!!!

Happy Friendship Day!!!

Mojito Cupcakes

Masterchef Australia season 4

For the syrup:
30gm sugar+ 45ml rum+ 10 ml limejuice+Zest of 1 lemon+Mint leaves+ 100 ml water
heat all the ingredients in a pan till the sugar has just dissolved and turn off the heat, and leave to infuse.

For the Genoise Spongecake:
6 eggs
260gms Castor sugar
150gms melted Butter
260gms Refined flour

  •  Preheat the oven to 180'C
  • Whisk the eggs and castor sugar over a double boiler with an electric whisk. Continue to whisk until the mixture reaches a ribbon consistency. ( About 10 minutes).You can test it by lifting a little mixture with a spoon and drooping it back into the bowl, while moving the spoon. the misture should not sink immediately and should leave a visible trail.
  • Once it reaches this stage, whisk it off the double boiler for a few minutes to cool it slightly. Now pour in the melted butter along the sides of the bowl and slowly fold it in.
  • Pour in the flour in the same manner a little at a time and fold it in. This is done to make sure that you don't knock out the air from the batter as this is what will allow the cake to rise in the oven. Moving the batter around too much, or not folding ingredients in gently will cause it to loose all the air you whisk into the eggs.
  • Pour the batter into cupcake cases and bake immediately for 10 minutes or until a skewer comes out clean.
  • Cool the cupcakes.
Mint and lemon Buttercream:

150gms unsalted butter
300gms Sifted Icing sugar
5gms Mint leaves
Zest of 2 lemons

  • Whisk the butter until slightly creamy.now add in the icing sugar a little at a time, whisking continuously. Once all the icing sugar is almost added in, add in the mint leaves and lemon zest and whisk.
  • Pipe or spread on the cupcakes and top with a lemon wedge.
  • * Do NOT skip the lemon wedge!!! I know squeezing lemon juice on a cupcake before eating it might sound weird, but the little burst of lemon juice over the buttercream icing just before eating the cupcake it what makes it beyond heaven!!!


Saturday, June 30, 2012

How to-Gumpaste


Have you ever had one of those days where it looks a little cloudy outside and you have to go out (inspite of hating the rains,sue me :/) and you decide to wear that white t shirt just because the weather in this city is just weird and downright hot. You obviously didn't know it would start pouring just when you were too far away to turn around and go home.
Ofcourse not.
 You also didn't know that buying that dark coloured t-shirt out of panic incase you got drenched would ultimately be useless because just as you did , the sun came out from behind the clouds and mocked you.
Life was just pulling one of those regular 'Bruce Almighty' days on you. And to top it all off, you pretty manicured feet with the bright neon O.P.S nailpolish was ruined.
Ruined!
And some people still love the rains.
Gah.
:/
However, if you truely ARE having a 'Bruce Almighty' day ,it will work out anyway :)
Kind of like Gumpaste.


Ok. I'm just going to go ahead and say this before I have you fooled.
I'm really no expert here.
All that I'v learned here is just from experience,long nights of staying awake for orders and a lot of "what-the-hell-is-wrong-with-this-gumpaste-why-is-it-being-a-lunatic" days..

Calm down for a second.
Take a deep breath.
This is'nt rocket science. Just pretty much edible clay. See, that doesn't sound so scary now does it?

Iv'e put together a few little pointers that I think might help :) Any questions are welcomed  :)

  • Be a little patient.It's a little tricky to get the consistency right  but you'll get the hang of it soon enough.
  • Always, I repeat ALWAYS sieve the icing sugar. Sure, it takes a little extra time but little lumps of icing sugar at a later stage and a complete nuisance .
  • Gel colours are highly recommended.They give you and even,vivid colour without changing the consistency of the gumpaste and making it sticky. Otherwise, you will end up adding more icing sugar to get rid of the stickiness which will lighten the colour. So you will have to add more color and then... You get the point right?
  • Also, if you are colouring you gumpaste in low light /at nighttime, make sure to check the colour under  white light, yellow light can be very decieving !!       
  • Humidity is your worst enemy.
    Another reason to hate the monsoons. Ha!!
    It makes it difficult to work with gumpaste and sometimes,it gets too humid, once you have covered the cake,made your decoration etc,it begins to get sticky and patchy and pretty much can't be saved.


  • Always make sure that the surface you are kneading/rolling out the gumpaste on as well as your hands are  ABSOLUTELY clean and dry.I've found it handy to keep a small damp and dry towel within reach and wipe the table between using different colours/usuing different batches just to be on the safe side.A lot of gumpaste can get wasted from one streak of dark colour on a light coloured batch. :(
  • This one's a big one.
    Ever heard of cornflour?? Use it!! It's what allows you to ensure that the gumpaste doesn't stick to the table,rolling pin etc. It's easy to dust it off later. Never use plain icing sugar for dusting(I've seen a lot of people do this) ,the icing sugar is a little caorse and does not give you a smooth finish.
  •  When trying to make a complicated design, Break it down. It's easy to panic when it looks very complicated but making small,simpler pieces and then assembeling them together is much easier.
    Use egg white to stick different pieces together and allow it ample time to dry.
  • Read up!! Check blogs, books and maybe even just google images to get ideas and pick up little tricks . Nothing works better than learning from other people's mistakes :P:P


GUMPASTE:

Icing sugar          125gm
Gelatin                  10gm
Liquid Glucose      10gm
Lemon juice           a few drops
Cornflour             s required


  • Dissolve the gelatin powder in 30ml of water in a steel/heatproof bowl and allow it to bloom/rest for 10 min.
  • Sieve the icing sugar and set it aside.
  • Simmer some water in a shallow pan . Melt the gelatin alonw with the liquid glucose and stir until it is a smooth mixture.
  • Now, take this off the heat and slowly pour it into the icing sugar and knead until you get a firm dough.
  • Store in a ziplock bag and try and use as soon as possible.


Thursday, June 21, 2012

Crumbly pepper Garlic Crackers


Let me just tell you something.
More butter is better .
It's just that simple.
If there is one thing everyone should have learned at the end of their lives, that should be it.
These crackers taught me that, the more butter the better:) Just not too much, because thats pushing it ,no?
Butter makes the world a better place, its good for everything, well, except your hips ofcourse :/
Don't get me started on that.


The first time I made these, we used them as a base for one of our starters during a buffet in college. They were topped with a mixture of sundried tomatoes and spicy aubergines and finally with cheese.
I didnt really have a recipe, just the basic propotions for shortcrust and we added the amount of garlic and pepper that 'looked' right and it turned out amazing! (there never was such a thing as too much garlic, right?)
Heaven.
 Im sure that using this as a crust for a chicken pie would also be a brilliant idea.:)Too often, those poor pies just have a plain boring shortcrust. This will jazz it up a bit !

This week has been so happy. Towering new wedge shoes, Bright pink chappals for the rains, quiet lunches at a new restaurant,baking class with some good friends tomorrow and a birthday party at the end of the week have made it busy busy but fun. Plus, the rains are delayed !! :):) more sunshine please!

Crumbly Pepper Garlic Crackers

100 gms Flour
  70gms  Butter (chilled and cubed.)
    5gms  Salt
  50gms  Chopped Garlic
  10gms   Crushed Peppercorns (Black Pepper powder is also a good substitute)
    5ml      Olive oil
              Chilled Water

  • Heat the olive oil in a pan, and saute the chopped garlic for 1-2 min until cooked.Leave it aside to cool
  • Sift the salt along with the flour.Sprinkle in the crushed peppercorns and garlic as well.
  • Now, add the cubed butter and gentle rub the butter and flour together in your hands over and over again until it begins to resemble the texture of wet sand.Make sure that there are no lumps of butter in the mixture.
  • Alternatively , you can cut the butter into the flour with a knife .
  • Ensure that you do not knead the dough while incorporating the butter,otherwise the pastry will become tough.
  • Now ,sprinkle a little chilled water over the mixture and bring it together into a ball slowly.Again, be careful not to knead it.Use a little additional chilled water if you require.
  • Flatten it into a thick rectangle, wrap it in clingwrap and refrigerate for half an hour.
  • Preheat the oven to 160 'C
  • Dust a clean surface with flour and roll out the chilled dough onto it to about 1/2 cm thick. cut it into small squares or any shape you like and place it on a silpat or lightly greased baking tray.
  • Bake for 5-7 minutes depending on the size or until the crackers are golden brown around the edges.
  • Cool and store in an airtight container!!!

PS: If you are wondering what that chicken-y thing in the last picture is , its
Shredded cooked chicken + Chopped spring onion+raw mango cubes+Pepper+salt+Thai chilli sauce :)

Saturday, June 16, 2012

Daddy :)


Everybody has that one person who makes you feel like you're 5 years old again no matter how old you are, or think you are.
Yea,I call mine dada
He'll call me moti and then say I'm not fat.
Wake up at 5am just to drop me to the station.
Be willing to test all the stuff from my biggest kitchen disasters.
Even if it's burnt. (that has to be Love, right? :P)

Threaten to beat up the boys who make me cry.
Fight with me.
Fight the world for me.
Tell me I look prettier without makeup.
Has never ever said "You can't do it" no matter how big or ridiculous my dreams have been.
Wince if my dress is too short.
Bring home Ice cream randomly.
Stay up all night to make 200 easter eggs with us.
then Turn it into a party.
Will tell "daddy" jokes when my friends come over just to make em' laugh.

Maybe I'm too old(or heavy :S) for dada to pick my up by my legs and hold me upside down these days, but hey, that dos'nt change anything eh???
Love you dada :)
Happy Father's day!!!!


PS : I made you watery coffee :) in your favourite mug !!

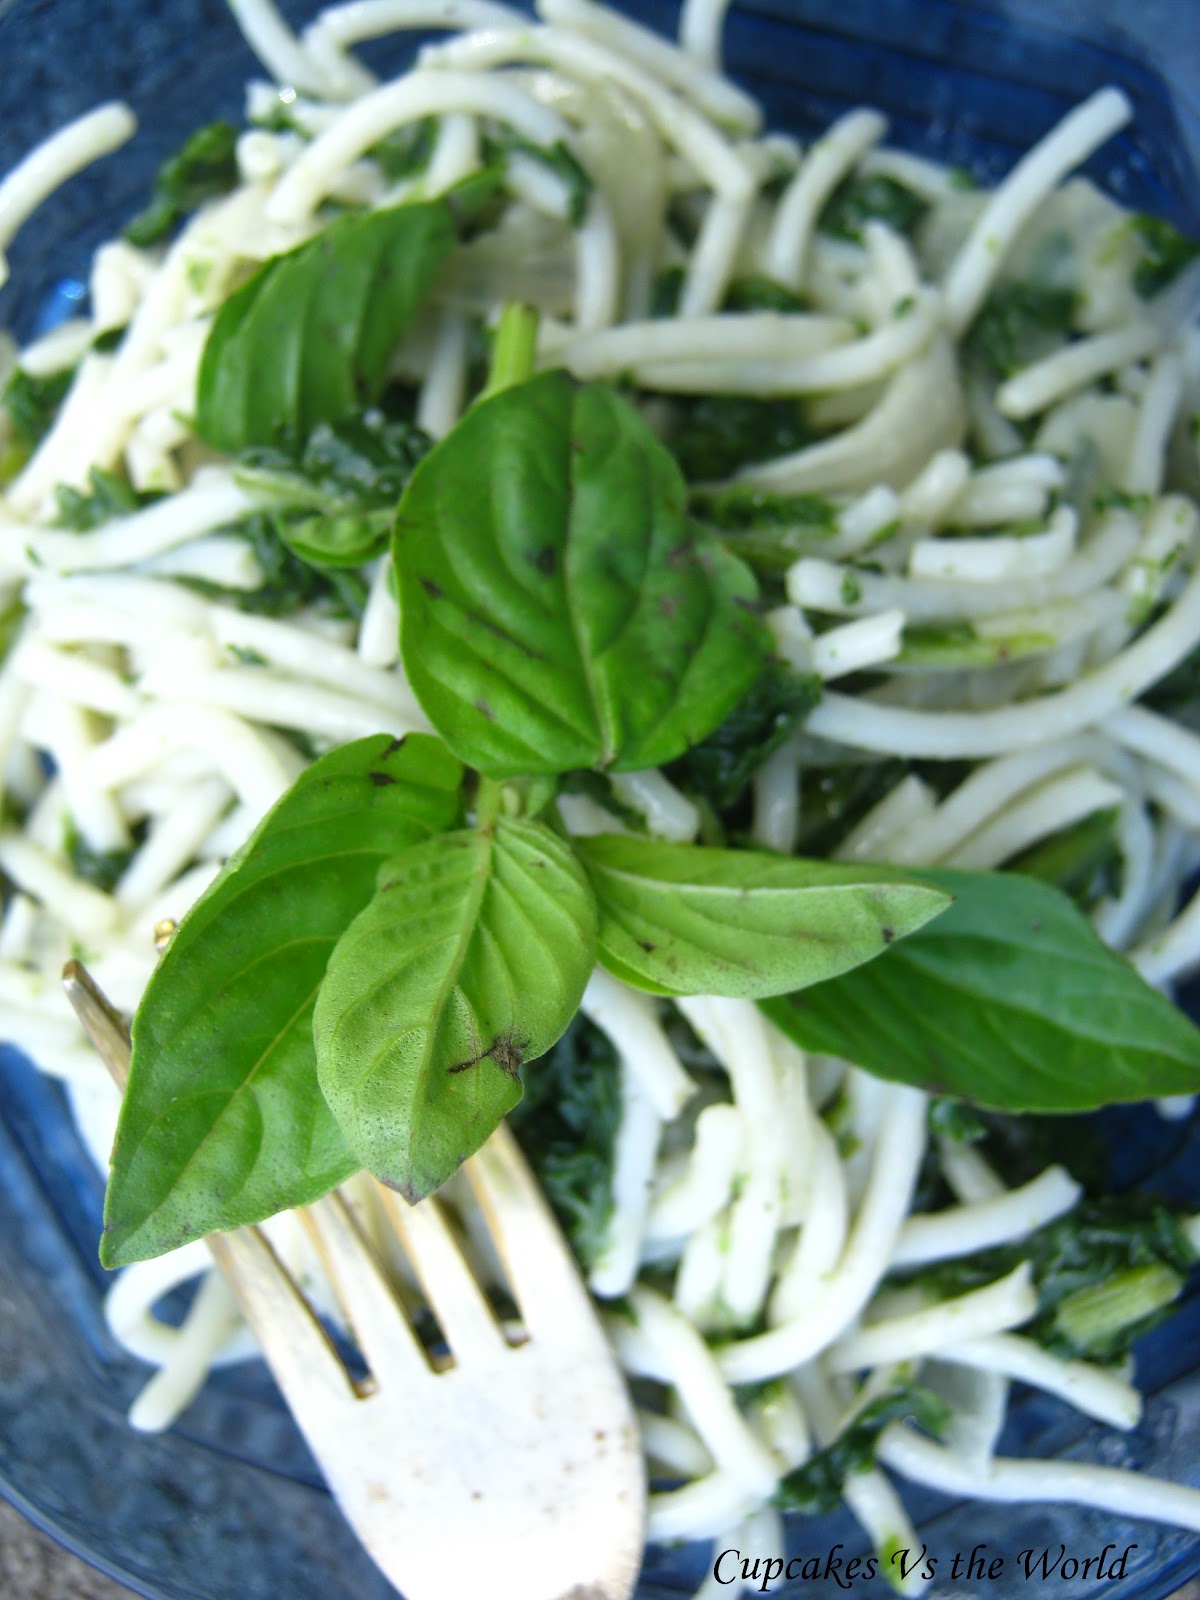
Creamy Spinach tossed Spaghetti


You know what I realised recently?
I enjoy home entertaining. It's fun planning a menu and listing out ingredients and cooking for people.We recently had a little lazy afternoon lunch and cocktails thing at home and this spaghetti was one of the dishes I made. When I started cooking I didnt really have a recipe in mind for the spaghetti but I think this came together pretty well.
 You can serve it as a main or a small portion as a warm salad, works well both ways. Anyway, it was such a hit that all the entire bowl was over by the end of the evening and I had'nt managed to get a single photo.
So the next morning, I made another batch and packed it up with a few plates and props to get a few nice photos in what was the last of the sunny days.
                                                       Let me tell you a little secret.......


                                                          Ive fallen in love with basil.
 It can completely turn a dish around.The one thing you have to be careful of though, is not to add it too early in the cooking process otherwise it turns black and looks limp.
It's best to add in at the very end, or if the food has to be reheated for service at a later stage then add it at that time !!
Many people tend to confuse Tulsi with basil, however although they are closely related their tastes are very different. Basil used in Italian cooking, is a little sweeter while tulsi has an overpowering sort of spicy taste to it.


We went to the local YMCA and quickly snapped a few shots before being shooed out by the watchman.
Hmpfh.
Anyway, I'm pretty happy with the way they turned out. I'm slowly getting more confident with this. :) Whaddya think?


Creamy Spinach tossed Spinach

Spaghetti            200 gms
Spinach leaves   200gms(washed)
Garlic                   30gms
Onion                   20gms
Fresh Cream         50ml
Fresh Basil              5gms
Cheese                 (optional)
Olive oil                  20 ml
Salt                        to taste
Black pepper(crushed or powder) to taste

Method:
  • Cook the spaghetti in boiling salted water, till aldente. Blanch the whole spinach leaves in salted water and set aside.
  • Chop the garlic finely and slice the onions. Drain out as much water as possible from the spinach and roughly chop it up with a knife.
  • In a pan, heat up the olive oil on med. heat. Add in the garlic and saute for a few minutes. Add in the onion, and cook till it begins to sweat/becomes transparent.
  • Next, add in the chopped spinachand saute for a few minutes. Pour in the fresh cream and stir to seperate the spinach.
  • Finally, add in the cooked and drained spaghetti and gently toss or stir it to evenly coat it with the spinach mixture. Sprinkle the cheese and season.
  • Add the basil leaves and give it a final stir.
  • Serve hot :)

Thursday, June 14, 2012

Trams and big yellow taxicabs

Theres some comfort that comes from knowing that amazing things can happen in the spur of a moment.I recently got the opportunity to travel to a few cities and cook in peoples homes for a project that came out of the blue.It amazed me how everything just fell into place. I guess I should stop worrying about the future so much and learn to trust that everything will ALWAYS work out. (corny, i know, but it's true !!!).
Also , I discovered that they sell passionfruit in Kolkata for 10 bucks!!! WHATTT!! 
I know, might seem like a minor development to everyone else, but to me, I'm like : "Oh.My.God." =)
  Between the one incident where a rat scurried over my foot in Delhi, full day power cuts in Chennai, making Idli batter in the hotel room, eating masala rabit and amazing seafood at Anjappars in Chennai,laughing mindlessly till 1 am at the hotel coffeeshop and cooking in kitchens that sometimes were literally 5x3 ft, I got to say, it.was.amazing.

Sadly, I did'nt think it was necessary to carry my camera around to Delhi and Chennai and missed out on a lot of fun snaps. Here is kolkata...

          The yellow ambassador taxis are hard to miss. Theyre everywhere and adorable!this is my favourite picture

          At the market, happy happy picture


              Passionfruit?


                Old houses with these little charming post boxes !


             At the market, tomatoes on the street...


                             Cycle rickshaws, so amusing!!!


Oh, and just a word of caution , little bengali boys seem to have a knack of following you around if you're cooking the food . deal with it. :)